Getting started with Compute
Installation
To use Compute, you'll need an environment token and the Subo command line tool. The environment token allows Compute to authenticate with our service that manages metadata storage, telemetry, and more.
Install Subo: the Compute CLI
If you use macOS, you can use Homebrew to install the
subo command line tool:
brew tap suborbital/subo
brew install subo
Note: this may take a few minutes! Next, run subo --version to ensure the
installation was successful.
To install on Linux (or macOS without Homebrew), you can download Subo directly.
Generate your token
You can get a Compute Environment token either with our environment token generator web app or with the subo command line tool.
The domain of your email address should match the environment you
configure for Compute; i.e., if your email is laika@example.com, your
Compute environment would be called com.example. See Fully-qualified
function names
for more
information.
To create your token, run:
subo compute create token <email>
A verification code will be sent to your email address, and the token will be used to authenticate you and link your Compute installation to you.
Subo will print out your token in your terminal, and cache it for use in subsequent steps.
Keep your environment token safe (store it in your password manager), and only use it when running or installing Compute. If you lose it, just repeat this token generation process.
Run Compute locally
To run Compute locally, you'll use the Subo CLI and Docker, both of which must be installed before continuing.
Prepare your local environment
The Subo CLI will create some files on disk to set up your local deployment,
so get started by creating a directory somewhere on your filesystem. In the
example below, we'll name our directory suborbital:
mkdir suborbital
cd suborbital
Start Compute
Next, use Subo to start your local Compute Core instance. Make sure to do
this within the same directory you created above! You can verify that
you're in the correct directory by verifying that it contains the
docker-compose.yaml file.
subo compute deploy core --local
You may be asked to enter your Environment Token, and then Subo will use docker-compose to launch your Compute Core instance automatically. Compute runs in the background by default. You can use docker-compose logs -f to view the logs of the running containers. Run docker-compose down to terminate the containers.
Run Compute
When you run Compute, it will wait for you to press enter to start a REPL where you can add or edit functions (see Meet the Compute Editor). In the example below, we'll create a function named hello:
✅ DONE: ready to start installation
⏩ START: installing...
▶️ docker-compose up -d
Container suborbital-scc-control-plane-1  Recreate
Container suborbital-scc-control-plane-1  Recreated
Container suborbital-scc-atmo-1  Recreate
Container suborbital-scc-atmo-1  Recreated
Container suborbital-scc-control-plane-1  Starting
Container suborbital-scc-builder-1  Starting
Container suborbital-scc-control-plane-1  Started
Container suborbital-scc-builder-1  Started
Container suborbital-scc-atmo-1  Starting
Container suborbital-scc-atmo-1  Started
ℹ️  use `docker ps` and `docker-compose logs` to check deployment status

PROXY: local tunnel to function editor started


Press enter to launch the local Compute REPL...


1. Create or edit a function

Choose an option: 1

To create or edit a function, enter its name (or FQFN): hello
This will allow you to create functions and use the Compute editor locally while you work on integrating your application. Follow the instructions in the REPL to create your first function.
Meet the Compute editor
The Suborbital Compute function editor uses Compute's APIs to provide a low-friction environment for your users to write, build, test, and deploy functions to your Compute an instance in a single place. Alternatively, the Builder API can be used programmatically, if that better suits your use case.
A quick way to try the editor is to use the REPL built into the Subo CLI introduced above in Run Compute Locally. The Subo REPL includes a proxy that makes it easy to connect the hosted editor to your local Compute installation.
By default, it makes the editor accessible on local.suborbital.network:80. The editor proxy port can be configured with the subo compute deploy core --local --proxy-port <some port> option.
The local.suborbital.network subdomain points to 127.0.0.1, i.e. localhost. You may need to substitute a different hostname or IP address depending on your particular network setup.
Editor URLs
To edit a function via the editor, you—or more likely your application—must build a valid URL to pass to the editor. When working locally, the Subo REPL can generate editor URLs for you automatically.
In a development environment, the URL should have these components:
http://local.suborbital.network/?builder=http://local.suborbital.network:8082&token=ogbWUbzCZaYLga3GggP0cxht&ident=com.suborbital.acmeco&namespace=default&fn=hello
In a production environment, the URL may look something like this:
https://editor.suborbital.network?builder=https://builder.acmeco.com&token=K78as0aslwi30l8h5lbF4lS7&ident=com.suborbital.customer&fn=add-record&template=rust
The important differences to note between these URLs are the local and public hostnames and HTTP and HTTPS schemes for the editor itself and the &builder= parameter.
For more information, check out our complete documentation for each of the URL parameters.
Your first function
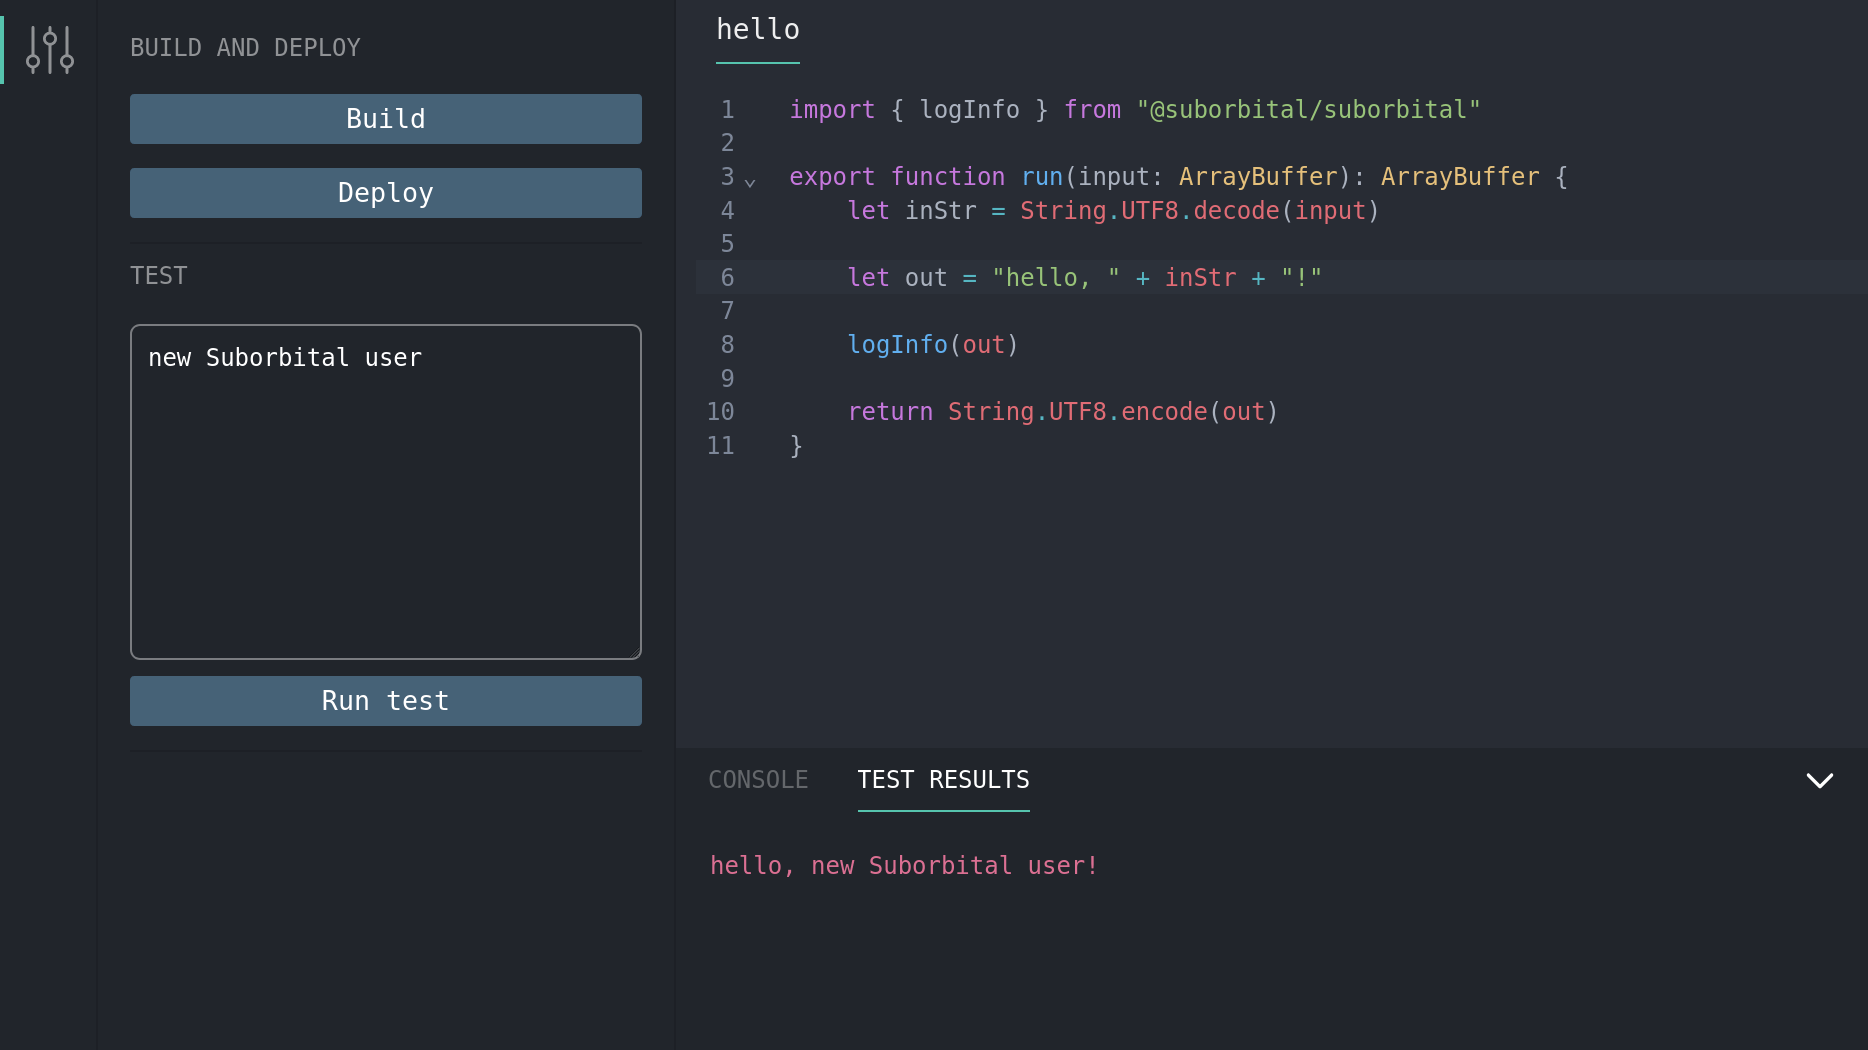
Once inside the editor, you can edit, build, test, and deploy your functions all in one place. By default, the editor will load pre-populated with the greeting function below. We can use it to run the editor for the first time.
import { log } from ''@suborbital/runnable";

export const run = (input) => {
    let message = "Hello, " + input;

    log.info(message);
    return message;
};
- The function provided is complete, so we can just click "Build"
- In the "TEST" field, add some text. Here, we've added "new Suborbital user"
- Click "Run test"
- Toward the bottom of the editor, click "TEST RESULTS". There's our greeting!
Executing functions
Once your first function has been built and deployed, it can be run with a request to the Execution API.
export ENV_TOKEN=<your previously generated token>

curl http://local.suborbital.network:8080/com.suborbital.acmeco/default/hello/v1.0.0 \
     --header "Authorization: Bearer $ENV_TOKEN" \
     -d 'my friend'

hello, my friend
If you're invoking the Test API, you'll need to import the Editor Token instead of the Environment token in the code snippet above.
Connect your application
Now that you've set up Compute and created your first function, you can use Compute's APIs to start integrating functions into your application.